I am visiting my niece soon so, decided to bake something with cranberries because that's her favourite. Moreover, I have extra oatmeal left on my kitchen top, so why not? I googled for recipe that has these 2 ingredients and tada! There are a lot of recipes online but I am used to Joyofbaking's.
This recipe is very easy with short preparation and baking time. However because of my oven space constraint, it became time-consuming as I have to bake them in a total of 3 batches.
Showing posts with label therapeutic. Show all posts
Showing posts with label therapeutic. Show all posts
Wednesday, October 12, 2016

Saturday, January 9, 2016
Lemon-Poppy seeds muffin


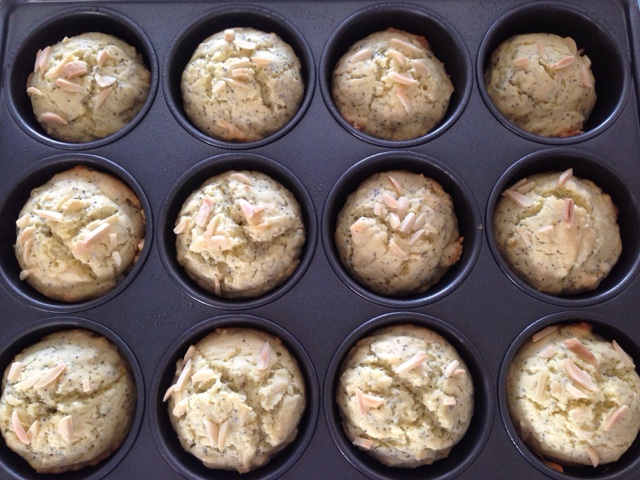
Poppy seeds are usually customary in flavoured bread, cakes, rolls and cookies. They are essentially the oilseed derived from the poppy plant, however, these seeds do not contain the narcotic properties as the opium poppy, though the plant contains alkaloids like morphine, the ripe seeds used for bakery or culinary contain only traces which does not cause any form of addiction.
They give the following benefits:
1) They are effective in quenching thirst, fever, inflammation and constipation.
2) Supply our daily dose of minerals, such as, iodine, manganese, zinc, magnesium and copper.
3) The oil from the seed is useful in treating carcinoma as it contains monounsaturated fatty acids.
4) They contain linoleic acid that helps in preventing heart disorders.
This is my first time using poppy seeds. Very interested in trying poppy seeds recipe. Just nice for my girls meet-up tomorrow. Recipe adapted from MarthaStewart with some minor adjustment.
Thursday, January 7, 2016
Sharpie marker tie-dye

The other day, had a lot of fun experimenting new tie-dye method with little sister. We found this method through youtube.
Friday, January 1, 2016
New year 2016
Happy New Year 2016!
Following up on my previous post, One needle, one thread, I couldn't finish the cross-stitch yesterday but I made it today! Good accomplishment to start the new year. ;)
As a grown up doing cross-stitching, I find it very therapeutic. I sound like an old lady. haha.
While doing this, I actually had a lot of thinking. I sound like an old lady even more now.
Anyway, still very addictive and satisfying as when I was a child.
Following up on my previous post, One needle, one thread, I couldn't finish the cross-stitch yesterday but I made it today! Good accomplishment to start the new year. ;)
As a grown up doing cross-stitching, I find it very therapeutic. I sound like an old lady. haha.
While doing this, I actually had a lot of thinking. I sound like an old lady even more now.
Anyway, still very addictive and satisfying as when I was a child.
Tuesday, December 29, 2015
One needle, one thread
Heyo! The conversation these days has evolved into the annual where has the time gone. When you hear this, you know that another year is coming to an end.
3 more days to New Year! Still can't believe time passed so quickly.
I told myself, I must finish this project I started beginning of the month.
3 more days to New Year! Still can't believe time passed so quickly.
I told myself, I must finish this project I started beginning of the month.
Saturday, December 19, 2015
A little Christmas baking - Crunchy Chocolate chip cookies
Chocolate chip cookies

Have been wanting to bake chocolate chip cookies for the longest time. Finally baked this successfully on one fine day. First time baking cookies, turned out not bad. Quite proud of myself ;)
This recipe is very easy. However it's time-consuming as I have to bake them in batches due to my oven space constraint. I had no experience in baking cookies at all, so my first batch was awfully burnt. After 15 minutes of baking, I pressed the cookies and they were soft. Since it's my maiden try, I thought they were underbaked. I baked for another 5 minutes and they were all burnt! Then I realised, the cookies would first be soft first at high temperature, and then harden and as they cool down. Mystery solved!
The batches after that were great! Really a learning through experience. ;)
Recipe adapted from Joyofbaking with some minor adjustment.
100g granulated white sugar
100g brown sugar
2 large eggs
1 1/2 tsp vanilla extract
295g all purpose flour
1 tsp baking soda
1/2 tsp salt
270g semisweet chocolate chips
100g chopped almonds (optional)

 In time for Christmas!

This recipe is very easy. However it's time-consuming as I have to bake them in batches due to my oven space constraint. I had no experience in baking cookies at all, so my first batch was awfully burnt. After 15 minutes of baking, I pressed the cookies and they were soft. Since it's my maiden try, I thought they were underbaked. I baked for another 5 minutes and they were all burnt! Then I realised, the cookies would first be soft first at high temperature, and then harden and as they cool down. Mystery solved!
The batches after that were great! Really a learning through experience. ;)
Recipe adapted from Joyofbaking with some minor adjustment.
Ingredients:
226g unsalted butter, room temperature100g granulated white sugar
100g brown sugar
2 large eggs
1 1/2 tsp vanilla extract
295g all purpose flour
1 tsp baking soda
1/2 tsp salt
270g semisweet chocolate chips
100g chopped almonds (optional)
Steps:
1) Preheat oven to 200dC.
2) Line baking tray with parchment/baking paper.
3) In an electric mixer, beat the butter until smooth and creamy.
4) Add the white and brown sugar to the mixture and beat until fluffy.
5) Add the eggs into the mixture, one at a time.
6) Add in vanilla extract into the mixture and beat until incorporated.
7) Scrape down the sides of the mixing bowl as needed.
8) In a separate bowl, whisk together the flour, baking soda and salt.
9) Add half of the dry ingredients to the egg mixture and beat until incorporated and then add the remaining.
10) About half way through mixing, add the chocolate chips and chopped almonds to the mixture. Note: If the dough is very soft, cover the mixing bowl and refrigerate until firm (from 30 minutes to 2 hours).
11) For large cookies, use about 2 tablespoons of dough or adjust according to your cookies size preference, and drop onto the prepared baking tray.
12) Bake at 200dC for 15 minutes, or until golden brown around the edges. Tips: Turn on your oven blower, if there is, for baking evenness. This only applies for cookies, and not for cakes.
13) Cool completely on wire rack.
Jesus said, "Come to me, all you who are weary and burdened, and I will give you rest" (Matt 11:28). In a world that is too much for us to bear alone, Christ has come to bring us into a relationship with Him and give us rest.
Our soul finds rest when it rests in God.
I wish that you all can find rest in Him.
Merry Christmas to everyone!
Thursday, November 19, 2015
Roasted pumpkin seeds

Remember the pumpkin seeds that we set aside when we made pumpkin bread? You will not regret what we can turn them into!
Yes, we can roast them into a delicious snack - crunchy, flavoursome and hellishly moreish! They are perfect for grazing as well as tossing into salads or sprinkling over soups and savoury bakes for added texture and seasoning. WOW!

So, after you scoop out the seeds and the stringy fibres from the pumpkin, set them aside in a bowl and add a little water for easy separation. We do not want the fibres, so you can discard them. We want the seeds!
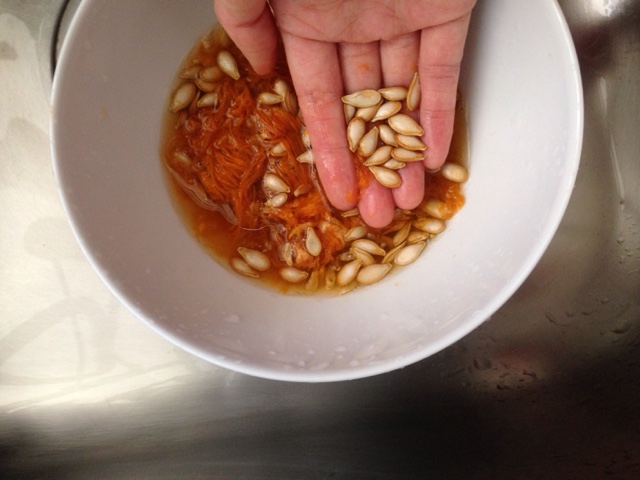
Preheat oven to 180dC. Coat the bottom of roasting pan with olive oil, about 2 tsp or so. Spread the seeds out over the roasting pan. Add 1 tsp of ground cinnamon, 1 tsp of ground ginger and a pinch of salt for taste and kick. You can add other spices/flavours of our preference. Toss the seeds to coat them with the oil and spices on the pan. Bake for 15-20 minutes. Toss the seeds every 5 minutes. You can taste the seeds every now and then but make sure you do not burn yourself because it's 180dC! The seeds are ready when they begin to brown and crunchy.

Voila!
Do not discard pumpkin seeds again next time.
Pumpkin Bread

Got out of my comfort zone and finally tried baking pumpkin bread for the first time. This bread is moist with honey-coloured finish. It's full of pumpkin flavour and its complementary spices. This recipe makes 2 loaves. Trust me, it's not a lot.
Adapted the recipe from Joyofbaking.
This recipe calls for canned pure pumpkin but I made my own pumpkin puree. It's not fun but it's satisfying!
Ingredients:
450g all purpose flour1 tsp baking powder
1 tsp baking soda
1/2 tsp salt
1 1/2 tsp ground cinnamon
1/4 tsp ground ginger
120g chocolate chips
4 large eggs
400g granulated white sugar
226g unsalted butter, melted
425g pure pumpkin puree
120ml water
1 tsp vanilla extract

Cut the pumpkin in half lengthwise, remove all the seeds and stringy fibers, and place them on baking tray. DO NOT THROW THE SEEDS AWAY! THEY CAN BE ROASTED LATER! I did not grease the tray because I want it totally fresh. Bake at 180dC for approximately 45 minutes to 1 hour (depending on size) or until easily pierced with a fork. Let it cool down until you can touch it with your bare hands. Scoop out the flesh and puree in a food processor until smooth. Add a little water if it's too dry. Then strain the puree through a piece of cheesecloth suspended over a strainer to extract all the liquid.


In a large bowl, whisk together the flour, baking powder, baking soda, salt and ground spices. Then, stir in the chocolate chips.


Using an electric mixer, whisk the eggs until lightly beaten and then add in sugar and melted butter and mix to combine.

Stir in the pumpkin puree, water and vanilla extract and mix well. Do not worry if it's too liquid as we will be adding the dry mixture soon.


Add the dry mixture to the pumpkin mixture, slowly and mix until all the ingredients are combined and mixture is smooth. Do not over mix as it will turn the bread tough.
Divide the batter evenly into the two greased pans. Bake the breads at 180dC for 45-50 minutes, or depending on your oven performance.
It's ready when the bread turns golden brown and a toothpick inserted in the center comes out clean (a few moist crumbs is fine). Set aside on wire rack to let it cool before removing the breads from pans.


Voila!
Remember the pumpkin seeds that we set aside just now? We can roast them! Recipe linked here: Roasted pumpkin seeds.
Tuesday, November 17, 2015
Blueberry Lemon Bread with Lemon Glaze

This lovely bread bursts with juicy sweet blueberries and brushing on lemon glaze once baked, not only gives the bread a nice citrus flavour, but also makes the bread tender and moist. Blueberries are rich in antioxidants, high in finer and potassium and low in sodium.
It is a healthy pound cake, which makes it perfect anytime of the day with a cup of tea.
Recipe adapted from Joyofbaking.
Ingredients:
Lemon blueberry loaf195g all purpose flour
1 tsp baking powder
1/4 tsp salt
1 tbsp grated lemon zest
1 pack of blueberries
113g unsalted butter, melted
125g granulated white sugar
2 large eggs
1 tsp vanilla extract
120ml milk
Lemon glaze
25g granulated white sugar1 tbsp fresh lemon juice

Steps:
1) Preheat oven to 180dC.
2) Butter or spray non-stick spray at the bottom and sides of a loaf pan.
3) In a separate bowl, whisk together the flour, baking powder, salt and lemon zest. Leave aside.

4) Remove 1 tablespoon of the flour mixture and toss with the berries gently in separate bowl to coat the berries. Leave aside. (This helps to prevent the berries from sinking to the bottom of the pan while baking).
5) In an electric mixer, beat the butter and sugar until light and fluffy.
6) Add the eggs into the mixture, one at a time.
7) Scrape down the sides of the mixing bowl as needed.
8) Add in vanilla extract into the mixture.
9) Add in 1/3 of flour mixture (dry ingredients) and 1/2 of milk alternately, starting and ending with the flour.
10) Beat until combined.
11) Switch off the electric mixer and fold in the coated blueberries gently so they do not crush and stain the whole batter blue.
12) Scrape the batter into the loaf pan and bake at 180dC for 40-50 minutes, or depending on your oven performance.
13) It's ready when the bread turns golden brown and a toothpick inserted in the center comes out clean. Set aside to let it cool.
14) Lemon glaze: In a microwaveable bowl, stir the sugar with lemon juice. Microwave for about 20 seconds or until sugar has dissolved.
15) Once bread is cooled, pierce a few holes on the top of the load with a wooden skewer/chopstick/toothpick and then brush with the lemon glaze. (Holes are for the bread to absorb the lemon glaze evenly).


Voila!
Tuesday, August 4, 2015
Sharpie Therapy
Slowly settling in.
Adjusting to new environment.
I have to believe that it is possible.

Adjusting to new environment.
I have to believe that it is possible.
Subscribe to:
Posts (Atom)