Showing posts with label bake. Show all posts

Monday, December 19, 2016

Last bake of Year 2016! - Mascarpone cheesecake


Photo taken from google


This is really the last bake for this year! Need to try finishing all my baking ingredients because it's going to be months before I bake again! Next time round, will be 'baking with rainbow' ;). I needed to finish up the mascarpone cheese, so, I was searching for cheesecake with mascarpone cheese in the recipe. It turned out creamy and light with tad of lemon fragrance, just right to my liking!

Monday, December 12, 2016

Fudgy Chocolate Brownie

I craved for brownie and I just had to bake it on my own to control the level of sweetness. I love baking brownie because it's super easy and only 2 big bowls are required. Love it when washing is kept to minimal. :)

Thursday, December 1, 2016

Baking in December


Have been wanting to bake gingerbread man cookies for the longest time. Since we have entered into December and it's Christmas month, I have the best reason to bake them!

Most of the recipes found online contain molasses which add on the fragrance of the cookies. However, I do not have that and do not intend to buy, so I searched for recipe without it and found this recipe from MelanieCooks. This recipe is very easy.

Wednesday, October 12, 2016

Chewy oatmeal cookies with cranberries

I am visiting my niece soon so, decided to bake something with cranberries because that's her favourite. Moreover, I have extra oatmeal left on my kitchen top, so why not? I googled for recipe that has these 2 ingredients and tada! There are a lot of recipes online but I am used to Joyofbaking's.

This recipe is very easy with short preparation and baking time. However because of my oven space constraint, it became time-consuming as I have to bake them in a total of 3 batches.

Wednesday, April 6, 2016

Steamed Tapioca Kueh

Ah mm is back in town and I got the chance to learn her steamed tapioca kueh. This is a very simple and delicious recipe. 

The cake can have different colours; ranging from pale yellow to brown. If you are using yellow coloured tapioca, the colour will be naturally yellow. For white coloured tapioca, the kueh can be rather pale and some recipe will use yellow colouring. For this recipe, we used gula melaka and thus the brown colour. Anyhow, the taste is fantastic. :)

Friday, January 22, 2016

Know your flours

Photo by theculinarycook.com

When it comes to baking, for most of the recipes, flour is the main ingredient. However, there are so many types of flour in the market, how do you choose which one to use? Here's a little research that I have done and summarised for reference.


Saturday, December 19, 2015

A little Christmas baking - Crunchy Chocolate chip cookies

Chocolate chip cookies


Have been wanting to bake chocolate chip cookies for the longest time. Finally baked this successfully on one fine day. First time baking cookies, turned out not bad. Quite proud of myself ;)

This recipe is very easy. However it's time-consuming as I have to bake them in batches due to my oven space constraint. I had no experience in baking cookies at all, so my first batch was awfully burnt. After 15 minutes of baking, I pressed the cookies and they were soft. Since it's my maiden try, I thought they were underbaked. I baked for another 5 minutes and they were all burnt! Then I realised, the cookies would first be soft first at high temperature, and then harden and as they cool down. Mystery solved!

The batches after that were great! Really a learning through experience. ;)

Recipe adapted from Joyofbaking with some minor adjustment.

Ingredients:
226g  unsalted butter, room temperature
100g  granulated white sugar
100g  brown sugar
2 large eggs
1 1/2 tsp vanilla extract
295g  all purpose flour
1 tsp baking soda
1/2 tsp salt
270g semisweet chocolate chips
100g chopped almonds (optional)


Steps:
1) Preheat oven to 200dC.
2) Line baking tray with parchment/baking paper.
3) In an electric mixer, beat the butter until smooth and creamy.
4) Add the white and brown sugar to the mixture and beat until fluffy.
5) Add the eggs into the mixture, one at a time.
6) Add in vanilla extract into the mixture and beat until incorporated.
7) Scrape down the sides of the mixing bowl as needed.
8) In a separate bowl, whisk together the flour, baking soda and salt. 
9) Add half of the dry ingredients to the egg mixture and beat until incorporated and then add the remaining.
10) About half way through mixing, add the chocolate chips and chopped almonds to the mixture. Note: If the dough is very soft, cover the mixing bowl and refrigerate until firm (from 30 minutes to 2 hours).
11) For large cookies, use about 2 tablespoons of dough or adjust according to your cookies size preference, and drop onto the prepared baking tray.
12) Bake at 200dC for 15 minutes, or until golden brown around the edges. Tips: Turn on your oven blower, if there is, for baking evenness. This only applies for cookies, and not for cakes.
13) Cool completely on wire rack.

In time for Christmas!


Jesus said, "Come to me, all you who are weary and burdened, and I will give you rest" (Matt 11:28). In a world that is too much for us to bear alone, Christ has come to bring us into a relationship with Him and give us rest. 

Our soul finds rest when it rests in God. 

I wish that you all can find rest in Him. 

Merry Christmas to everyone!

Monday, November 30, 2015

Bake with Yen @ Puchong

Cousin recommended this baking supply shop, Bake with Yen at Puchong.


Went there on Saturday for the first time and goodness! It's a heaven for bakers! You can get basically everything that you require at low price. Most of the things are much more cheaper than supermarket.


The things are arranged neatly, shelf by shelf, so do not worry you can't find the things you want.


The have different packaging size to cater for different needs. This is plus point for me!


Besides ingredients, they also sell a wide range of baking utensils and essentials.


They provide baking classes too. Link here.

They will be launching their online shop soon. Keep a lookout at their website.


Store locations:

PUCHONG
No. 30 & 32, Persiaran Puteri Satu,
Bandar Puteri 47100 Puchong,
Selangor Darul Ehsan
Tel: +603 8060 1828Fax: +603 8061 0828
Opening hour:
Monday – Saturday
9:00am – 6:00pm
Closed: Sunday
----------------------------------------

PETALING JAYA

6, Jalan SS 24 / 13,
47301 Petaling Jaya,
Selangor Darul Ehsan
Opening hour:
Monday – Saturday
9:00am – 6:00pm
Closed: Sunday
----------------------------------------

CHOW KIT – JALAN RAJA LAUT

29 & 33, Lorong Haji Taib Satu
50350 Kuala Lumpur
Tel: +603 2692 7623
Fax: +603 2694 5668
Opening hour:
Monday – Saturday
9:00am – 6:00pm
Closed: Sunday
----------------------------------------

TAMAN TUN DR ISMAIL

TS123 – TS125, Pasar Besar TTDI
60000 Kuala Lumpur
Opening hour:
Tuesday – Friday
8:00am – 5:00pm
Saturday
8:00am – 4:00pm
Sunday
8:00am – 12:00pm
Closed: Monday
----------------------------------------

BANDAR BARU BANGI

32, Jalan Medan Pusat 2C,
43650 Bandar Baru Bangi, Bangi,
Selangor Darul Ehsan
Opening hour:
Monday – Saturday
9:00am – 6:00pm
Closed: Sunday
----------------------------------------

IPOH, PERAK

Lot 1
Commercial Complex at Centro,
Jalan Medan Istana 5,
Bandar Ipoh Raya,
Ipoh, Perak
Opening hour:
Monday – Saturday
8:30am – 5:30pm
Closed: Sunday
----------------------------------------

KOTA DAMANSARA, SELANGOR

No 18 & 20, Jalan Pekaka 8/4
Kota Damansara,
47810 Petaling Jaya,
Selangor
Opening hour:
Monday – Saturday
9:00am – 6:00pm
Closed: Sunday
----------------------------------------

TAMAN SRI RAMPAI, KUALA LUMPUR

59 & 57, Jalan 46B/26, Rampai Town Centre,
Taman Sri Rampai, Setapak
53300 Kuala Lumpur.
Opening hour:
Monday – Saturday
9:00am – 6:00pm
Closed: Sunday

Thursday, November 19, 2015

Roasted pumpkin seeds


Remember the pumpkin seeds that we set aside when we made pumpkin bread? You will not regret what we can turn them into!

Yes, we can roast them into a delicious snack - crunchy, flavoursome and hellishly moreish! They are perfect for grazing as well as tossing into salads or sprinkling over soups and savoury bakes for added texture and seasoning. WOW!


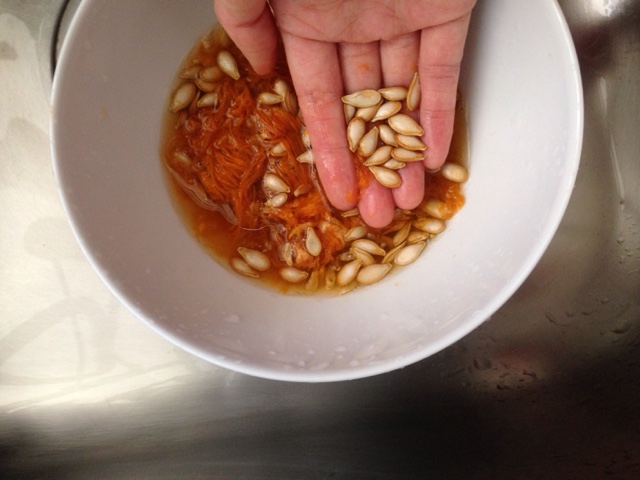
So, after you scoop out the seeds and the stringy fibres from the pumpkin, set them aside in a bowl and add a little water for easy separation. We do not want the fibres, so you can discard them. We want the seeds!


Preheat oven to 180dC. Coat the bottom of roasting pan with olive oil, about 2 tsp or so. Spread the seeds out over the roasting pan. Add 1 tsp of ground cinnamon, 1 tsp of ground ginger and a pinch of salt for taste and kick. You can add other spices/flavours of our preference. Toss the seeds to coat them with the oil and spices on the pan. Bake for 15-20 minutes. Toss the seeds every 5 minutes. You can taste the seeds every now and then but make sure you do not burn yourself because it's 180dC! The seeds are ready when they begin to brown and crunchy.


Voila!

Do not discard pumpkin seeds again next time.

Pumpkin Bread


Got out of my comfort zone and finally tried baking pumpkin bread for the first time. This bread is moist with honey-coloured finish. It's full of pumpkin flavour and its complementary spices. This recipe makes 2 loaves. Trust me, it's not a lot.

Adapted the recipe from Joyofbaking.

This recipe calls for canned pure pumpkin but I made my own pumpkin puree. It's not fun but it's satisfying!


Ingredients:
450g  all purpose flour
1 tsp baking powder
1 tsp baking soda
1/2 tsp salt
1  1/2 tsp ground cinnamon
1/4 tsp ground ginger
120g chocolate chips
4 large eggs
400g  granulated white sugar
226g  unsalted butter, melted
425g pure pumpkin puree
120ml water
1 tsp vanilla extract


Cut the pumpkin in half lengthwise, remove all the seeds and stringy fibers, and place them on baking tray. DO NOT THROW THE SEEDS AWAY! THEY CAN BE ROASTED LATER! I did not grease the tray because I want it totally fresh. Bake at 180dC for approximately 45 minutes to 1 hour (depending on size) or until easily pierced with a fork. Let it cool down until you can touch it with your bare hands. Scoop out the flesh and puree in a food processor until smooth. Add a little water if it's too dry. Then strain the puree through a piece of cheesecloth suspended over a strainer to extract all the liquid. 


In a large bowl, whisk together the flour, baking powder, baking soda, salt and ground spices. Then, stir in the chocolate chips.


Using an electric mixer, whisk the eggs until lightly beaten and then add in sugar and melted butter and mix to combine.


Stir in the pumpkin puree, water and vanilla extract and mix well. Do not worry if it's too liquid as we will be adding the dry mixture soon.


Add the dry mixture to the pumpkin mixture, slowly and mix until all the ingredients are combined and mixture is smooth. Do not over mix as it will turn the bread tough.

Divide the batter evenly into the two greased pans. Bake the breads at 180dC for 45-50 minutes,  or depending on your oven performance.

It's ready when the bread turns golden brown and a toothpick inserted in the center comes out clean (a few moist crumbs is fine). Set aside on wire rack to let it cool before removing the breads from pans.


Voila!

Remember the pumpkin seeds that we set aside just now? We can roast them! Recipe linked here: Roasted pumpkin seeds.

Tuesday, November 17, 2015

Blueberry Lemon Bread with Lemon Glaze


This lovely bread bursts with juicy sweet blueberries and brushing on lemon glaze once baked, not only gives the bread a nice citrus flavour, but also makes the bread tender and moist. Blueberries are rich in antioxidants, high in finer and potassium and low in sodium.

It is a healthy pound cake, which makes it perfect anytime of the day with a cup of tea.

Recipe adapted from Joyofbaking.

Ingredients:
Lemon blueberry loaf
195g  all purpose flour
1 tsp baking powder
1/4 tsp salt
1 tbsp grated lemon zest
1 pack of blueberries
113g  unsalted butter, melted
125g  granulated white sugar
2 large eggs
1 tsp vanilla extract
120ml milk

Lemon glaze
25g  granulated white sugar
1 tbsp fresh lemon juice


Steps:
1) Preheat oven to 180dC.
2) Butter or spray non-stick spray at the bottom and sides of a loaf pan.
3) In a separate bowl, whisk together the flour, baking powder, salt and lemon zest. Leave aside.

4) Remove 1 tablespoon of the flour mixture and toss with the berries gently in separate bowl to coat the berries. Leave aside. (This helps to prevent the berries from sinking to the bottom of the pan while baking).
5) In an electric mixer, beat the butter and sugar until light and fluffy.
6) Add the eggs into the mixture, one at a time.
7) Scrape down the sides of the mixing bowl as needed.
8) Add in vanilla extract into the mixture.
9) Add in 1/3 of flour mixture (dry ingredients) and 1/2 of milk alternately, starting and ending with the flour.
10) Beat until combined.
11) Switch off the electric mixer and fold in the coated blueberries gently so they do not crush and stain the whole batter blue. 
12) Scrape the batter into the loaf pan and bake at 180dC for 40-50 minutes, or depending on your oven performance.
13) It's ready when the bread turns golden brown and a toothpick inserted in the center comes out clean. Set aside to let it cool.
14) Lemon glaze: In a microwaveable bowl, stir the sugar with lemon juice. Microwave for about 20 seconds or until sugar has dissolved.
15) Once bread is cooled, pierce a few holes on the top of the load with a wooden skewer/chopstick/toothpick and then brush with the lemon glaze. (Holes are for the bread to absorb the lemon glaze evenly).


Voila!

Thursday, October 8, 2015

Chocolate Mud Cake

It's Chocolate Mud Cake kind of day!


Enough of cheesecake. Finally tried on chocolate mud cake today after procrastinating for few weeks. ;)

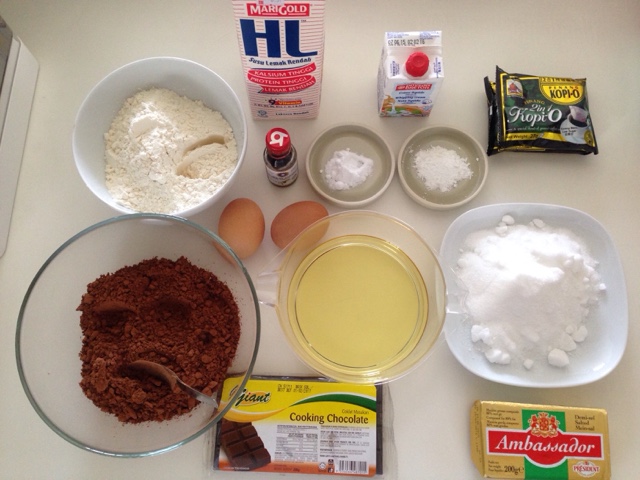
Here are the ingredients required:


Wet ingredients
2 large eggs
240ml warm water or coffee
240ml milk
120ml cooking oil
1 1/2 tsp vanilla extract

Dry ingredients
245g flour
190g cocoa powder
7g baking soda
6g baking powder
1/2 tsp salt
200g castor sugar

Steps
1) Combine flour, cocoa powder, baking soda, baking powder and salt together.
2) Sift the mixture and then combine with castor sugar.

3) Combine all the wet ingredients in a mixing bowl and mix well.
4) Slowly add in the dry ingredients (mixture (2)) and mix until smooth texture.

5) Pour into greased baking tray.

6) Bake for 35 mins for 180dC or according to your oven performance.
7) Tips: Cake is done when a toothpick inserted in the center comes out clean.

While baking, prepare the coating.

Dark chocolate butter ganache
200g dark chocolate (75% cocoa)
120g salted butter
125ml heavy cream

Steps
1) Add in dark chocolate and salted butter into a small bowl or saucepan and place it over medium-low heat for few minutes until both are soften and melt.
2) Pour the cream into the mixture and mix until smooth.
3) Refrigerate for 30-45 mins to cool down the ganache. Tips: Make sure it's loose enough to flow but thickened enough to stay on the cake.


Once ready, pour the ganache onto the cake to cover the whole cake. This is the fun part!

Put the cake back to fridge for at least 10 mins to let the ganache set to the cake.


Voila! Have a slice of chocolate mud cake with dark chocolate ganache and a cuppa rosemary tea! <3

Friday, October 2, 2015

Have a Lovely Day!


A little little sweet thing I did for tubby for breakfast this morning. <3

His respond was....boliao -_-

Tuesday, September 29, 2015

Classic Cheesecake


Classic Cheesecake

Ingredients:
Crust
Crushed digestive biscuits 185g
Unsalted btuter 100g
1/2 tsp salt
1/2 tsp castor sugar

Filling
Cream cheese 500g
Sour cream 200g
Castor sugar 85g
1 tsp lemon zest
1 tsp lemon juice
1/2 tsp salt
2 tsp vanilla essence
3 eggs (beat well first)


Steps:
1) Make sure all the ingredients are at room temperature.
2) Preheat oven at 200dC.

3) Crust: Crush the biscuits, pour in the melted butter, salt and sugar and mix well.
4) Grease and line the cake pan.
5) Pour in the biscuits mixture and press firmly into the base of your cake pan.
6) Bake crust for 15 mins or until set/dry. Set aside to cool.
7) Reduce temperature to 150dC.
8) Boil water in a pot (to be used for waterbath)
9) Filling: Using a cake mixer, mix cream cheese and sour cream first. Then, add in the castor sugar, lemon zest, lemon juice, salt and vanilla essence. Once combined, only add in the eggs. (Tip: Beat the eggs first before adding to the mixture to give a smoother texture. Add in egg last to avoid lumps).
10) Sieve the filling once to remove lumps.
11) Pour the filling onto the crust.
12) Place the cake pan in another pan with boiled water, serves as waterbath.


13) Bake for 1 hr 30 mins at 150dC, or depending on your oven performance.
14) Once baked, let it cool and place in fridge for at least 4 hrs or overnight.

Voila!

Friday, September 18, 2015

Japanese cotton cheesecake - de cousin version

So it's another baking time. This time round at cousin's place.

Materials required:
Cream cheese - 125ml
Whipping cream - 100ml
Butter - 60g
Egg yolk - 3 pieces
Egg white - 3 pieces
Castor sugar - 50g
Superfine flour/cake flour - 30g
Corn flour - 10g

Steps:
1) Whisk cream cheese, butter (cut into smaller pieces) and whipping cream over waterbath. Cream cheese and butter will melt nicely into a creamy smooth texture.


2) In a separate bowl, mix egg yolk (one at a time) and 30g of castor sugar until well mixed.


3) Separate cream cheese-whipping cream-butter mixture from waterbath. Add in egg yolk-sugar mixture. Note: Important not to mix over waterbath as egg yolk will be cooked.


4) Sift both flour to remove any lumps and fold in the flour gently. Do not over mix it as more gluten will form and make the batter stiffer.


5) Sift the mixture slowly into another bowl to remove lumps.


6) In a separate bowl, beat the egg white and the remaining 20g of castor sugar until smooth and fluffy. Recommend to use a handheld beater to give you more control.


7) Slowly fold in egg white mix to the mixture and mix well.


8) Line cake pan with baking paper.
9) Pour in the cake mixture.
10) Place the cake pan over hot water which serve as waterbath. Bake in waterbath so as the water will absorb the heat and provide a gentle, moist heat to bake the cake. Use a pan that gives about 5cm of hot water all round the cake pan. It's even better to place a folded towel at the bottom of the pan to make sure there is a layer of water beneath the cake pan.
11) Bake at 1600C for 1:20 hr or adjust according to your oven's performance.


VOILA! Fluffy Japanese cotton cheesecake


Happy baking :D