Showing posts with label own make. Show all posts
Showing posts with label own make. Show all posts
Thursday, June 2, 2016

Saturday, January 9, 2016
Lemon-Poppy seeds muffin


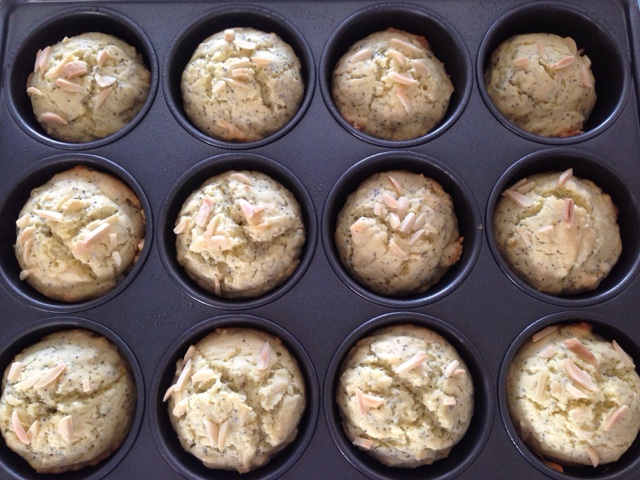
Poppy seeds are usually customary in flavoured bread, cakes, rolls and cookies. They are essentially the oilseed derived from the poppy plant, however, these seeds do not contain the narcotic properties as the opium poppy, though the plant contains alkaloids like morphine, the ripe seeds used for bakery or culinary contain only traces which does not cause any form of addiction.
They give the following benefits:
1) They are effective in quenching thirst, fever, inflammation and constipation.
2) Supply our daily dose of minerals, such as, iodine, manganese, zinc, magnesium and copper.
3) The oil from the seed is useful in treating carcinoma as it contains monounsaturated fatty acids.
4) They contain linoleic acid that helps in preventing heart disorders.
This is my first time using poppy seeds. Very interested in trying poppy seeds recipe. Just nice for my girls meet-up tomorrow. Recipe adapted from MarthaStewart with some minor adjustment.
Friday, January 1, 2016
New year 2016
Happy New Year 2016!
Following up on my previous post, One needle, one thread, I couldn't finish the cross-stitch yesterday but I made it today! Good accomplishment to start the new year. ;)
As a grown up doing cross-stitching, I find it very therapeutic. I sound like an old lady. haha.
While doing this, I actually had a lot of thinking. I sound like an old lady even more now.
Anyway, still very addictive and satisfying as when I was a child.
Following up on my previous post, One needle, one thread, I couldn't finish the cross-stitch yesterday but I made it today! Good accomplishment to start the new year. ;)
As a grown up doing cross-stitching, I find it very therapeutic. I sound like an old lady. haha.
While doing this, I actually had a lot of thinking. I sound like an old lady even more now.
Anyway, still very addictive and satisfying as when I was a child.
Tuesday, October 6, 2015
Soon Kueh
Another Ah Mm's recipe
Dough
1) 1kg soon kueh flour (otherwise, 700g rice flour + 300g tapioca starch)

2) 2 tbsp cooking/vegetable oil
3) 500ml hot water, boiling
Filling
1) 5 tbsp cooking/vegetable oil
2) 7 cloves garlic, peel and chop roughly

3) 5 onions, peel and chop roughly

4) 25g dried prawns, chop roughly (soak in water to soften the prawns)

5) 25g shittake mushrooms, slice thinly
6) 50g minced pork
7) 5 pieces of black fungus, wash and slice thinly

8) 2 carrots, slice thinly

9) 3 tbsp light soy sauce
10) 6 tbsp prawn juice
11) 3/4 tsp ground white pepper
12) 1 tsp dark soy sauce (not too much, otherwise the whole filling turn black)
13) 3 tbsp fish sauce
14) salt and sugar to taste
15) 2 turnips, wash, peel and cut matchstick size (if grating, make sure turnip doesn't turn mushy)

Steps


Wrapping steps
1) In a big bowl, add in soon kueh flour.
2) Slowly add in hot water and mix to a little shaggy dough and let it cool down for few minutes.


3) Add in oil and knead dough till smooth.

4) Rest dough for few minutes.
5) Dust both hands with flour and grab a handful of dough and roll into a ball shape.

6) Flatten the dough into thin round shape.

7) Scoop 2 tbsp of filling and place onto the center of the dough.


9) Brush a little bit of oil onto steaming tray to avoid soon kueh from sticking to the tray. Steam for 10 minutes low fire.


Voila!
Dough
1) 1kg soon kueh flour (otherwise, 700g rice flour + 300g tapioca starch)
2) 2 tbsp cooking/vegetable oil
3) 500ml hot water, boiling
Filling
1) 5 tbsp cooking/vegetable oil
2) 7 cloves garlic, peel and chop roughly
3) 5 onions, peel and chop roughly
4) 25g dried prawns, chop roughly (soak in water to soften the prawns)
5) 25g shittake mushrooms, slice thinly
6) 50g minced pork
7) 5 pieces of black fungus, wash and slice thinly
8) 2 carrots, slice thinly
9) 3 tbsp light soy sauce
10) 6 tbsp prawn juice
11) 3/4 tsp ground white pepper
12) 1 tsp dark soy sauce (not too much, otherwise the whole filling turn black)
13) 3 tbsp fish sauce
14) salt and sugar to taste
15) 2 turnips, wash, peel and cut matchstick size (if grating, make sure turnip doesn't turn mushy)
Steps
1) Fry cut onions and garlic.
2) Add in dried prawns and fry till brown with nice fragrance.
3) Add in mushroom and minced meat.
4) Season with light soy sauce, 3 tbsp of prawn juice, pepper and dark soy sauce.
5) Scoop out 2/3 of the filling.
6) Add in half radish, the remaining prawn juice, fish sauce, salt and sugar to the 1/3 filling in wok and stir.
7) Slowly add in more radish, black fungus and carrot.
8) Taste and stir until radish turn soft but not mushy.
9) Finally, add in the 2/3 filling and mix together.
Wrapping steps
1) In a big bowl, add in soon kueh flour.
2) Slowly add in hot water and mix to a little shaggy dough and let it cool down for few minutes.
3) Add in oil and knead dough till smooth.
4) Rest dough for few minutes.
5) Dust both hands with flour and grab a handful of dough and roll into a ball shape.
6) Flatten the dough into thin round shape.
7) Scoop 2 tbsp of filling and place onto the center of the dough.
8) Seal the edges by pinching.
9) Brush a little bit of oil onto steaming tray to avoid soon kueh from sticking to the tray. Steam for 10 minutes low fire.

Voila!
Tuesday, September 29, 2015
Classic Cheesecake


Classic Cheesecake
Ingredients:
CrustCrushed digestive biscuits 185g
Unsalted btuter 100g
1/2 tsp salt
1/2 tsp castor sugar
Filling
Cream cheese 500g
Sour cream 200g
Castor sugar 85g
1 tsp lemon zest
1 tsp lemon juice
1/2 tsp salt
2 tsp vanilla essence
3 eggs (beat well first)

Steps:
1) Make sure all the ingredients are at room temperature.
2) Preheat oven at 200dC.

4) Grease and line the cake pan.
5) Pour in the biscuits mixture and press firmly into the base of your cake pan.
6) Bake crust for 15 mins or until set/dry. Set aside to cool.
7) Reduce temperature to 150dC.
8) Boil water in a pot (to be used for waterbath)
9) Filling: Using a cake mixer, mix cream cheese and sour cream first. Then, add in the castor sugar, lemon zest, lemon juice, salt and vanilla essence. Once combined, only add in the eggs. (Tip: Beat the eggs first before adding to the mixture to give a smoother texture. Add in egg last to avoid lumps).
10) Sieve the filling once to remove lumps.
11) Pour the filling onto the crust.
12) Place the cake pan in another pan with boiled water, serves as waterbath.

13) Bake for 1 hr 30 mins at 150dC, or depending on your oven performance.
14) Once baked, let it cool and place in fridge for at least 4 hrs or overnight.

Voila!
Saturday, September 26, 2015
Homemade Muah Chee
I love muah chee!
One fine day, I was intrigued when cousin told me that she has a simple recipe to make muah chee. We then made it!
Strongly recommend the recipe below to all muah chee fans! Super easy super low cost!
~~~~~~~~~~~~~~~~~~~~~~~~~~~
Ingredients A
200g glutinous rice flour
300ml water
1 tbsp sesame oil
1 tsp sugar
pinch of salt
Fried shallots (optional)
Ingredients B-topping (estimate according to your preference)
Grated peanuts
Fried sesame seeds - blended
Sugar
Steps

1) Cut shallots and fry using sesame oil. This step is optional. I personally like the taste better with shallots. ;)


 2) In a clean mixing bowl, mix glutinous rice flour, water, sugar and salt together and stir until form paste
 3) Pour the mixture into pan together with fried shallots and put over low heat
4) Cover the pan
 5) After 5 minutes, open the pan, fold the sides towards centre and slowly roll into a dough.
6) Flip the dough every now and then for another 10 minutes.
7) Mix ingredients B in a plate, cut and roll dough in peanut mix.

One fine day, I was intrigued when cousin told me that she has a simple recipe to make muah chee. We then made it!
Strongly recommend the recipe below to all muah chee fans! Super easy super low cost!
~~~~~~~~~~~~~~~~~~~~~~~~~~~
Ingredients A
200g glutinous rice flour
300ml water
1 tbsp sesame oil
1 tsp sugar
pinch of salt
Fried shallots (optional)
Ingredients B-topping (estimate according to your preference)
Grated peanuts
Fried sesame seeds - blended
Sugar
Steps
1) Cut shallots and fry using sesame oil. This step is optional. I personally like the taste better with shallots. ;)
200g glutinous rice flour
4) Cover the pan
6) Flip the dough every now and then for another 10 minutes.
7) Mix ingredients B in a plate, cut and roll dough in peanut mix.
Voila!
Friday, September 18, 2015
Japanese cotton cheesecake - de cousin version
So it's another baking time. This time round at cousin's place.
Materials required:
Cream cheese - 125ml
Whipping cream - 100ml
Butter - 60g
Egg yolk - 3 pieces
Egg white - 3 pieces
Castor sugar - 50g
Superfine flour/cake flour - 30g
Corn flour - 10g
Steps:
1) Whisk cream cheese, butter (cut into smaller pieces) and whipping cream over waterbath. Cream cheese and butter will melt nicely into a creamy smooth texture.


2) In a separate bowl, mix egg yolk (one at a time) and 30g of castor sugar until well mixed.

3) Separate cream cheese-whipping cream-butter mixture from waterbath. Add in egg yolk-sugar mixture. Note: Important not to mix over waterbath as egg yolk will be cooked.

4) Sift both flour to remove any lumps and fold in the flour gently. Do not over mix it as more gluten will form and make the batter stiffer.


5) Sift the mixture slowly into another bowl to remove lumps.

6) In a separate bowl, beat the egg white and the remaining 20g of castor sugar until smooth and fluffy. Recommend to use a handheld beater to give you more control.


7) Slowly fold in egg white mix to the mixture and mix well.


8) Line cake pan with baking paper.
9) Pour in the cake mixture.
10) Place the cake pan over hot water which serve as waterbath. Bake in waterbath so as the water will absorb the heat and provide a gentle, moist heat to bake the cake. Use a pan that gives about 5cm of hot water all round the cake pan. It's even better to place a folded towel at the bottom of the pan to make sure there is a layer of water beneath the cake pan.
11) Bake at 1600C for 1:20 hr or adjust according to your oven's performance.


Materials required:
Cream cheese - 125ml
Whipping cream - 100ml
Butter - 60g
Egg yolk - 3 pieces
Egg white - 3 pieces
Castor sugar - 50g
Superfine flour/cake flour - 30g
Corn flour - 10g
Steps:
1) Whisk cream cheese, butter (cut into smaller pieces) and whipping cream over waterbath. Cream cheese and butter will melt nicely into a creamy smooth texture.
2) In a separate bowl, mix egg yolk (one at a time) and 30g of castor sugar until well mixed.
3) Separate cream cheese-whipping cream-butter mixture from waterbath. Add in egg yolk-sugar mixture. Note: Important not to mix over waterbath as egg yolk will be cooked.
4) Sift both flour to remove any lumps and fold in the flour gently. Do not over mix it as more gluten will form and make the batter stiffer.
5) Sift the mixture slowly into another bowl to remove lumps.
6) In a separate bowl, beat the egg white and the remaining 20g of castor sugar until smooth and fluffy. Recommend to use a handheld beater to give you more control.
8) Line cake pan with baking paper.
9) Pour in the cake mixture.
10) Place the cake pan over hot water which serve as waterbath. Bake in waterbath so as the water will absorb the heat and provide a gentle, moist heat to bake the cake. Use a pan that gives about 5cm of hot water all round the cake pan. It's even better to place a folded towel at the bottom of the pan to make sure there is a layer of water beneath the cake pan.
11) Bake at 1600C for 1:20 hr or adjust according to your oven's performance.
VOILA! Fluffy Japanese cotton cheesecake

Happy baking :D
Subscribe to:
Posts (Atom)